What is Swagger & Swagger UI?

Insha
Oct 4, 2024
APIs power modern software, allowing different systems to integrate smoothly. Swagger makes API development easier with tools for design, documentation, and testing. It helps developers and security engineers create clear, interactive API documentation, making it easier to understand and use APIs. Swagger standardizes API descriptions and provides interactive testing, which simplifies development and boosts collaboration between those who build and use APIs.
This blog provides a comprehensive guide to understanding and using Swagger for designing and documenting APIs.
What is Swagger?
Swagger is a set of tools that helps organizations design, build, document, and use RESTful APIs. It provides a standard way to describe the structure and behavior of the API, making it easier for developers and security engineers to understand and use it. It is important because it makes API development more efficient and consistent.
Using Swagger, organizations can create clear and interactive documentation that helps developers and users understand how to work with API. This improves communication, reduces errors, and speeds up the development process in the organization.
Swagger Components
Swagger consists of several key components that work together to streamline API development and documentation. These components provide a comprehensive toolkit for designing, documenting, and testing APIs effectively.
Let's explore the main components of Swagger and understand how they contribute to the API development process:
Swagger Specification (OpenAPI)
The Swagger Specification, or OpenAPI, defines RESTful APIs in a standard, machine-readable format. Security teams use it to outline every detail of the API, such as endpoints, request and response formats, parameters, authentication methods, and data models. This specification helps to document the API's functionality, making it easier for developers to understand and use the API. By adhering to a common format, swagger specification ensure consistency across different APIs and streamline the development process.
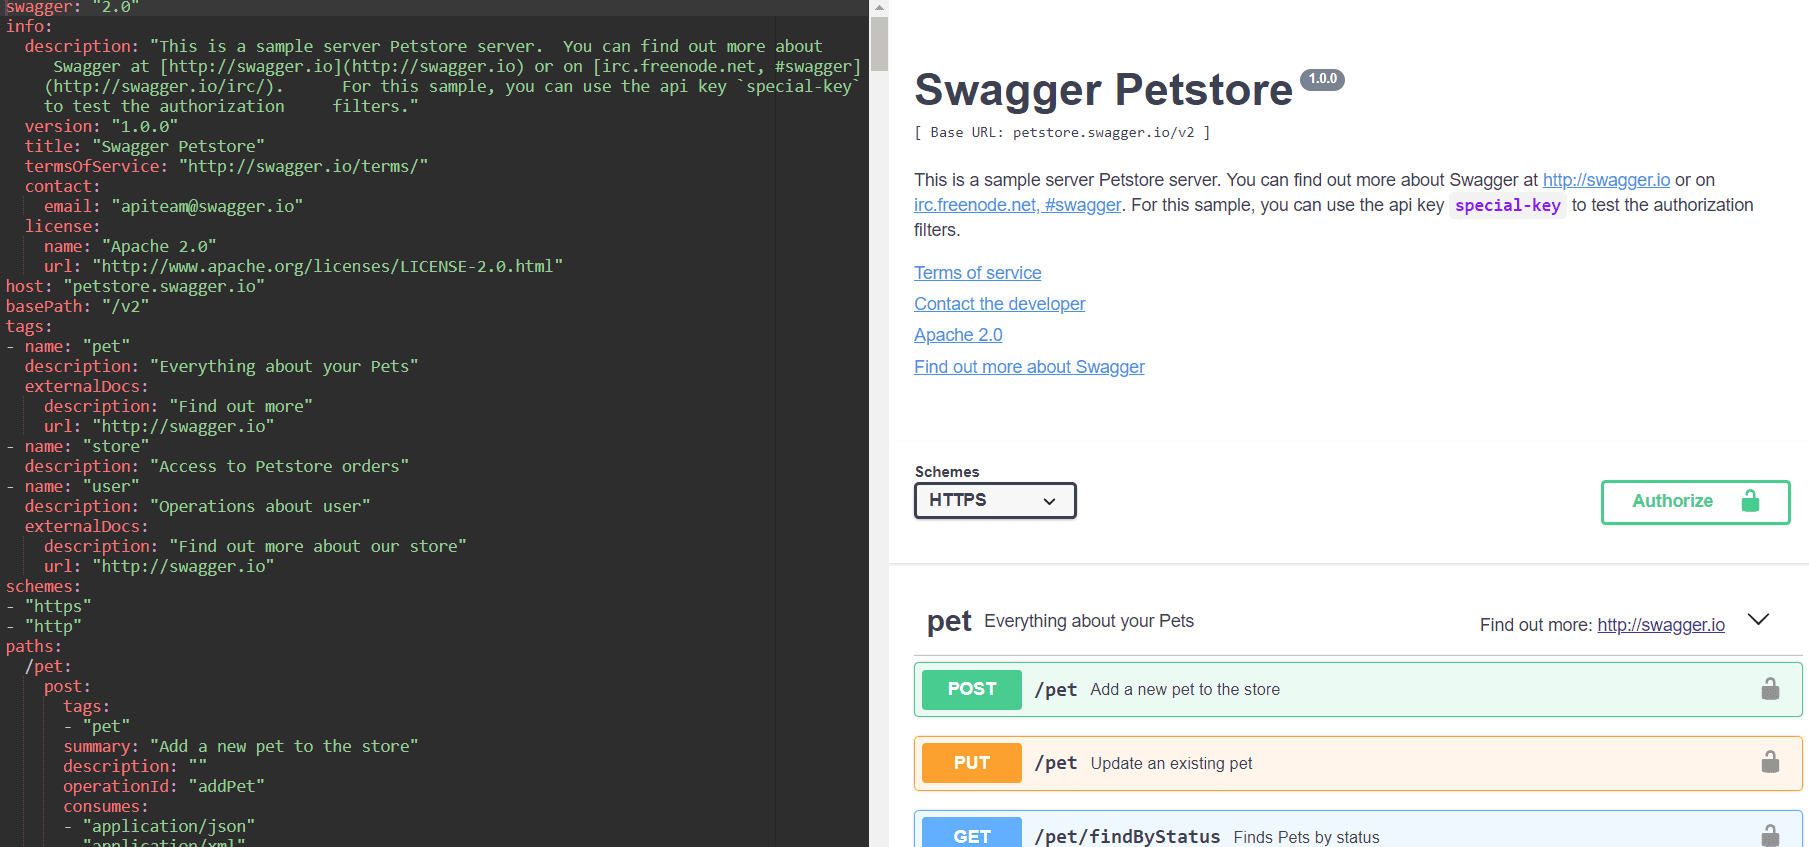
Swagger UI
Swagger UI presents the API documentation in a dynamic, web-based interface. HTTP methods that the API supports, parameters that the API requires, and responses that the API expects. Users can directly interact with the API, sending test requests and viewing responses, all from their browser. This interactive approach makes it easy for developers to learn, test, and integrate the API quickly, reducing the need for additional support or documentation.
Swagger Editor
Swagger Editor enables developers and security engineers to write and refine Swagger (OpenAPI) specifications online. It offers a real-time preview of the API documentation and instant validation and error checking to help correct mistakes as you go. Developers can define endpoints, set parameters, and describe request and response formats, all in a simple, user-friendly environment. By using Swagger Editor, developers maintain accurate and comprehensive API documentation that aligns with the latest changes and standards.
Swagger Codegen
Swagger Codegen automates the creation of client libraries, server stubs, and API documentation from the Swagger (OpenAPI) specification. Security teams select their preferred programming language, and Swagger Codegen generates the necessary code to integrate the API into different applications and platforms. This tool saves time by reducing manual coding and ensures that API implementations remain consistent across various environments.
Swagger Benefits
Swagger offers several key benefits that streamline API development, documentation, and integration. It enhances collaboration among developers, reduces the likelihood of errors, and makes APIs more accessible to users. Here are some of the main benefits:
Standardization
Swagger standardizes how organizations describe APIs, ensuring a consistent format across all API documentation. This standardization helps developers quickly understand API structures, request formats, and response behaviors, which reduces the chances of miscommunication and errors during development. By providing a uniform language for API specifications, Swagger enables seamless integration across different platforms and tools.
Simplicity
Swagger simplifies the entire process of creating, maintaining, and managing API documentation. It offers intuitive tools like Swagger Editor for writing API specs and Swagger Codegen for generating code, minimizing the time and effort required to document and implement APIs. This simplicity accelerates the API development lifecycle and makes it easier for security teams to keep documentation up-to-date.
Interactivity
Swagger UI turns static API documentation into a dynamic, interactive experience. It allows users to explore and test API endpoints directly in the browser, enabling them to understand API functionality more quickly. Users can send real requests and view real responses, which helps them identify issues faster and encourages more active engagement with the API.
Swagger Specification Example
Let's examine a practical example of a Swagger specification to better understand its structure and components.
Sample Swagger Specification File
Here’s the explanation for this sample YAML file.
OpenAPI Version
This specifies the version of the OpenAPI Specification being used.
API Info
This section provides metadata about the API, including its title, description, and version.
Paths
This section lists all the endpoints of the API.
Get All Users Endpoint
Path:
/usersMethod:
GETSummary: Brief description of the endpoint.
Description: Detailed explanation of what the endpoint does.
Response: Specifies the response for status code
200, including the structure of the JSON response, which is an array of user objects withid,name, andemailproperties.
Get User by ID Endpoint
Path:
/users/{id}Method:
GETSummary: Brief description of the endpoint.
Description: Detailed explanation of what the endpoint does.
Parameters: The path parameter
idis required and described.Responses:
200: Specifies the response structure for a successful request, returning a user object.404: Specifies the response when the user is not found.
What is Swagger UI?
Swagger UI is a web-based tool that presents the API documentation in an interactive, user-friendly interface. It allows users to explore available endpoints, view supported HTTP methods, understand request parameters, and test API requests directly from their browser. By turning static documentation into a dynamic experience, Swagger UI helps developers and users quickly learn and engage with the API, reducing the need for additional resources or support.
Setting Up Swagger UI
Let's walk through the process of setting up Swagger UI to create an interactive API documentation interface for your project.
Prerequisites
Make sure Node.js and npm (Node Package Manager) are installed on your computer.
Installation Steps
Follow these steps to install and set up Swagger UI for your project:
Download Swagger UI: Get the Swagger UI files from the Swagger UI GitHub repository.
Unzip the Files: Unzip the files to a directory you choose.
Install Dependencies: Open a terminal, navigate to the directory where you extracted the files, and run
npm installto install the necessary dependencies.
Basic Configuration
Configure Swagger UI by following these essential steps to set up the interactive API documentation:
Open the Configuration File: Locate the
index.htmlfile in the directory and open it in a text editor.Specify Your API Specification: Find the
urlparameter in theindex.htmlfile and set it to the URL of your Swagger (OpenAPI) specification file. For example:Run Swagger UI: Open the
index.htmlfile in a web browser. The interactive Swagger UI will display your API documentation.
Using Swagger UI
Swagger UI transforms the API documentation into an interactive experience. Let's explore how to use this powerful tool effectively:
Step 1: Open Swagger UI
Open the web browser and navigate to the directory with Swagger UI files (e.g., index.html).
Step 2: Load API Specification
In the index.html file, specify the URL of your Swagger (OpenAPI) specification file.
Explanation:
The
<link>and<script>tags load the Swagger UI CSS and JavaScript files from a CDN.Swagger UI renders the API documentation in the
<div id="swagger-ui"></div>.The
<script>block at the end initializes Swagger UI with the API specification URL.
Step 3: View the Documentation
Open the index.html file in the web browser. Swagger UI will load the API specification and display the interactive documentation.
Example Workflow
Let's walk through a practical example of using Swagger UI to interact with an API endpoint:
Select Endpoint: Click on the
GET /usersendpoint to expand its details and see the parameters, request body, and response formats it supports.Try it Out: Click the "Try it out" button to enable input fields where you can enter any required parameters or modify request data to test the endpoint.
Execute: Click the "Execute" button to send the API request with your inputs and trigger the server’s response.
View Results: Check the server's response, which will display data such as a list of users, along with the HTTP status code (e.g., 200 OK), response headers, and any other relevant information.
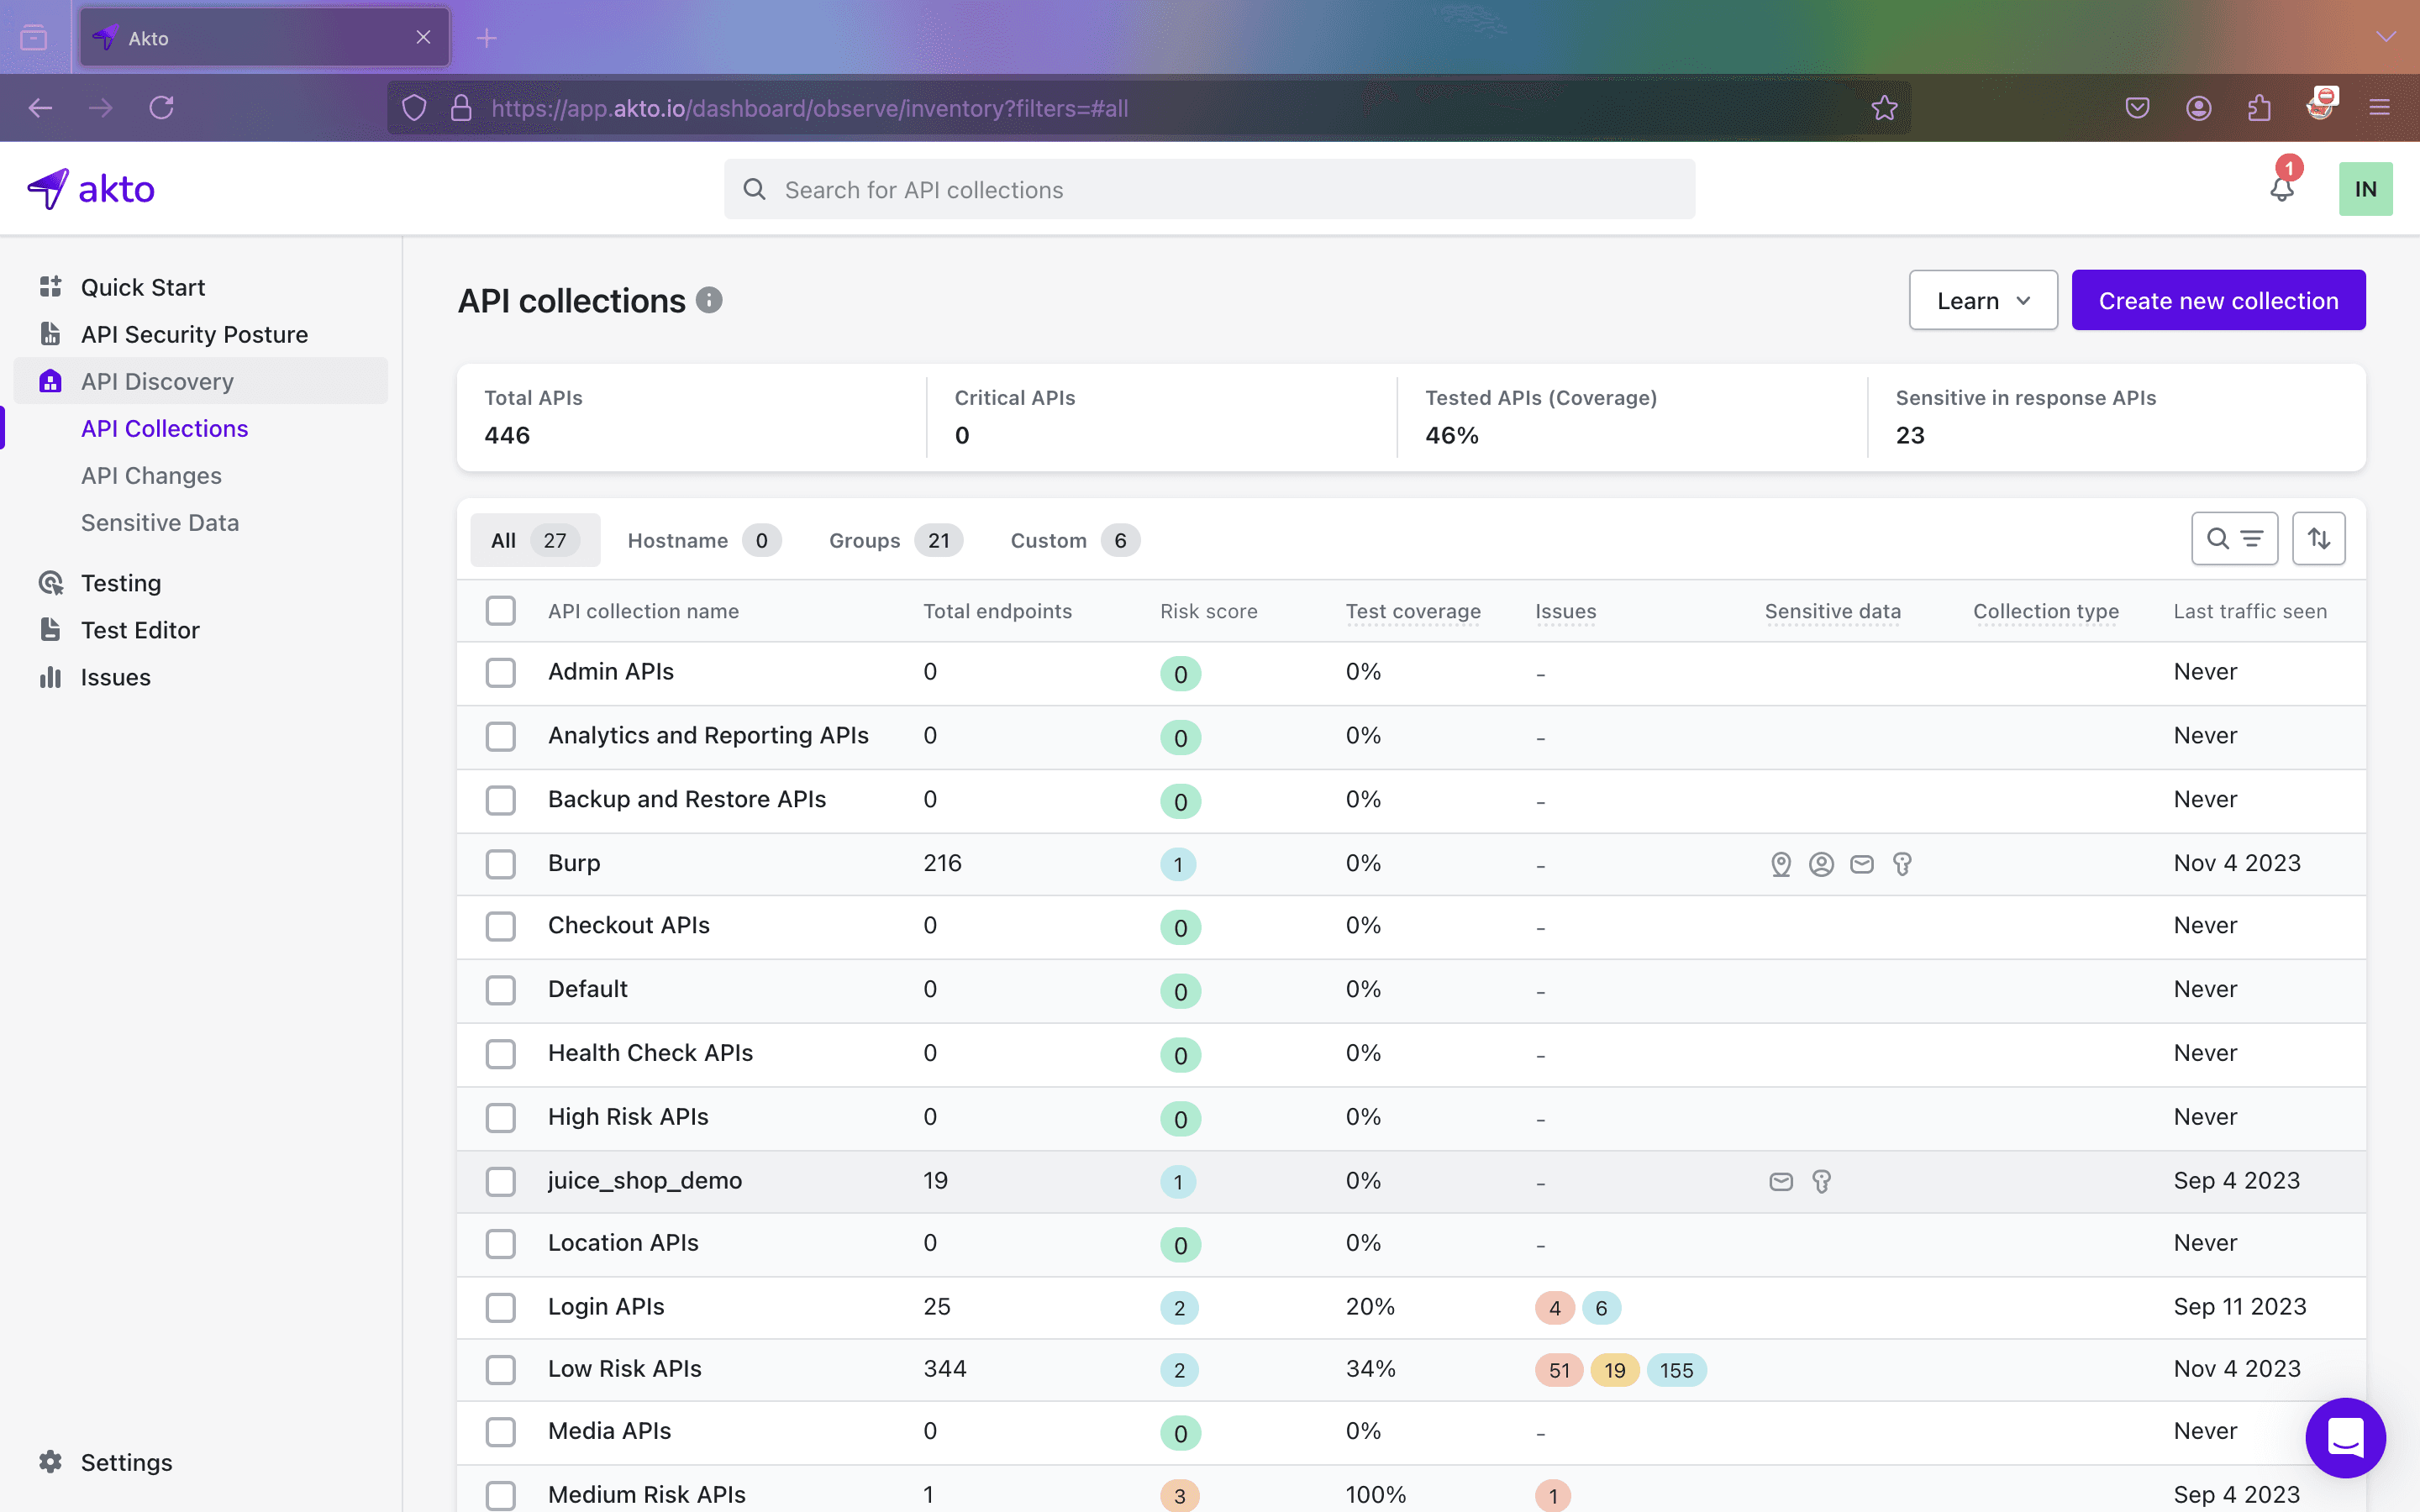
Creating Swagger File with Akto
Let's explore how an organization can leverage Akto to generate Swagger files effortlessly, enhancing the API development workflow and improving collaboration among team members.
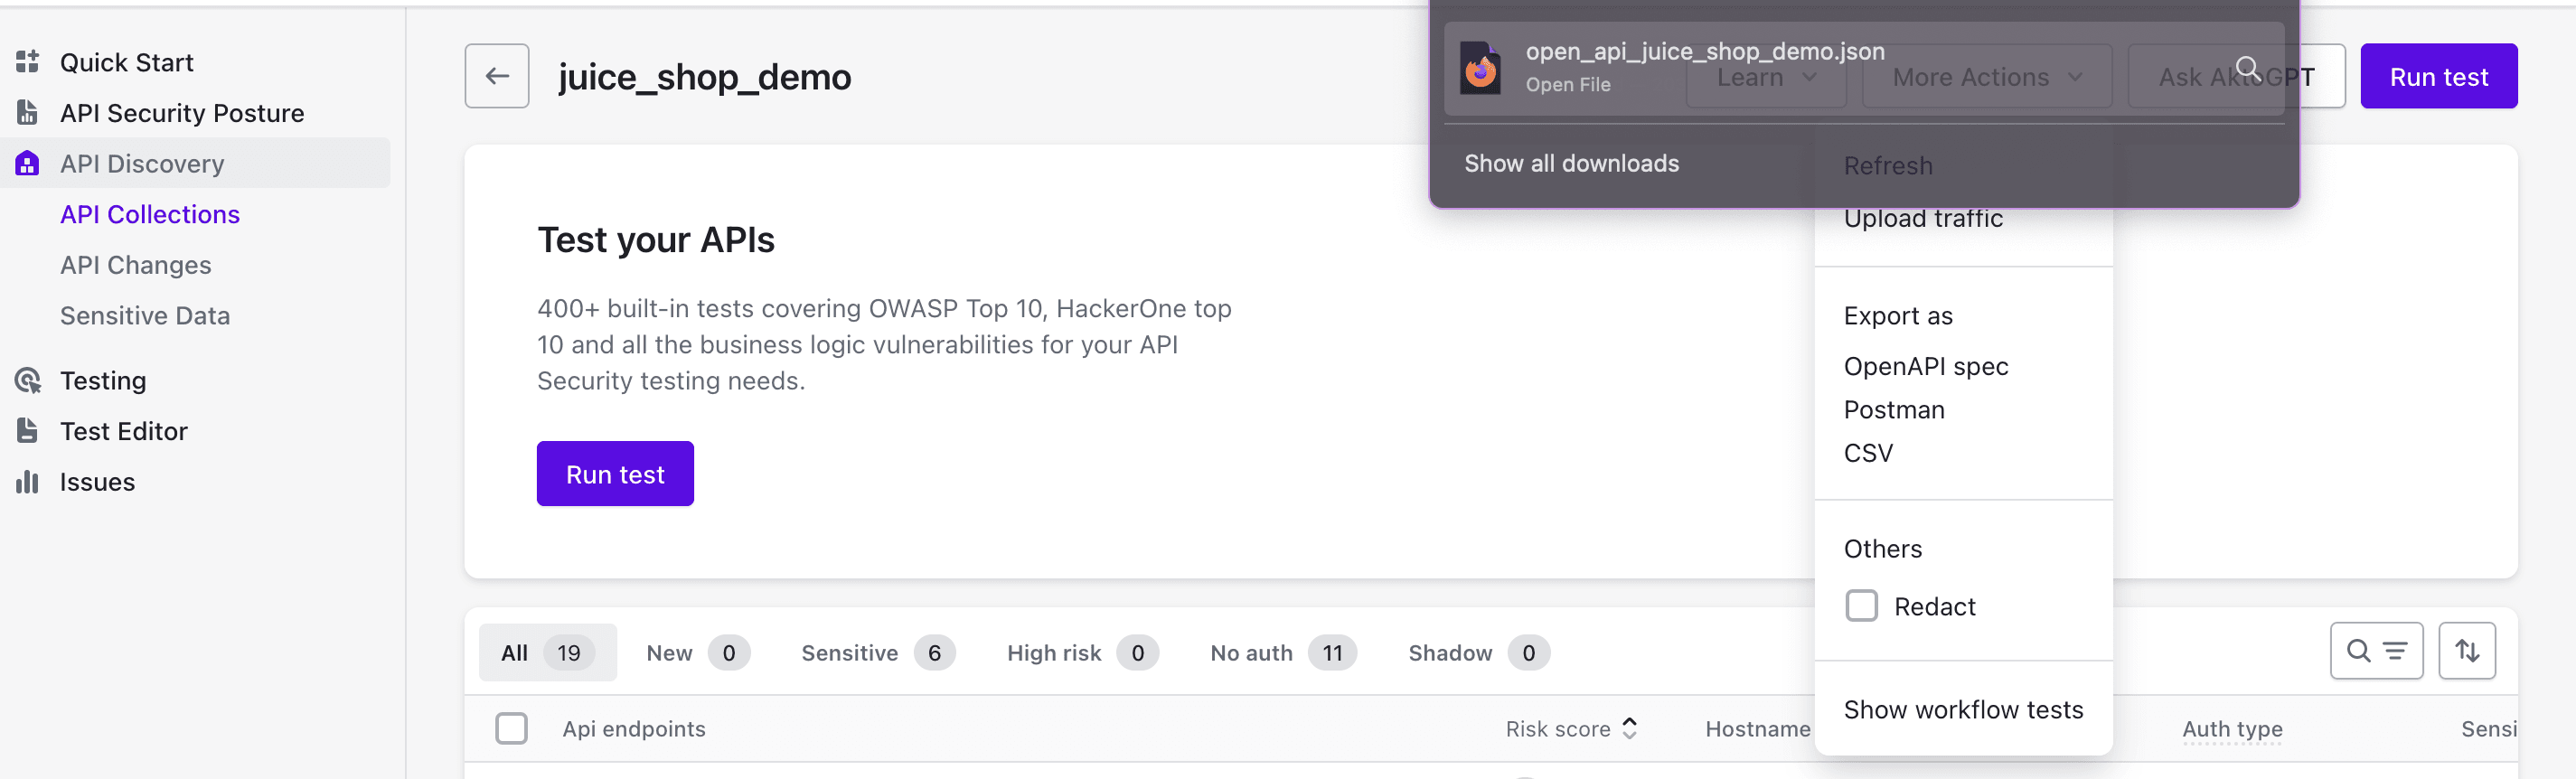
Step 1: Go to your API Collection. Choose a collection for which you want to create a Swagger file. In this case, I'm selecting "juice_shop_demo".
Step 2: Select “More Actions” from the drop-down and select OpenAPI spec.
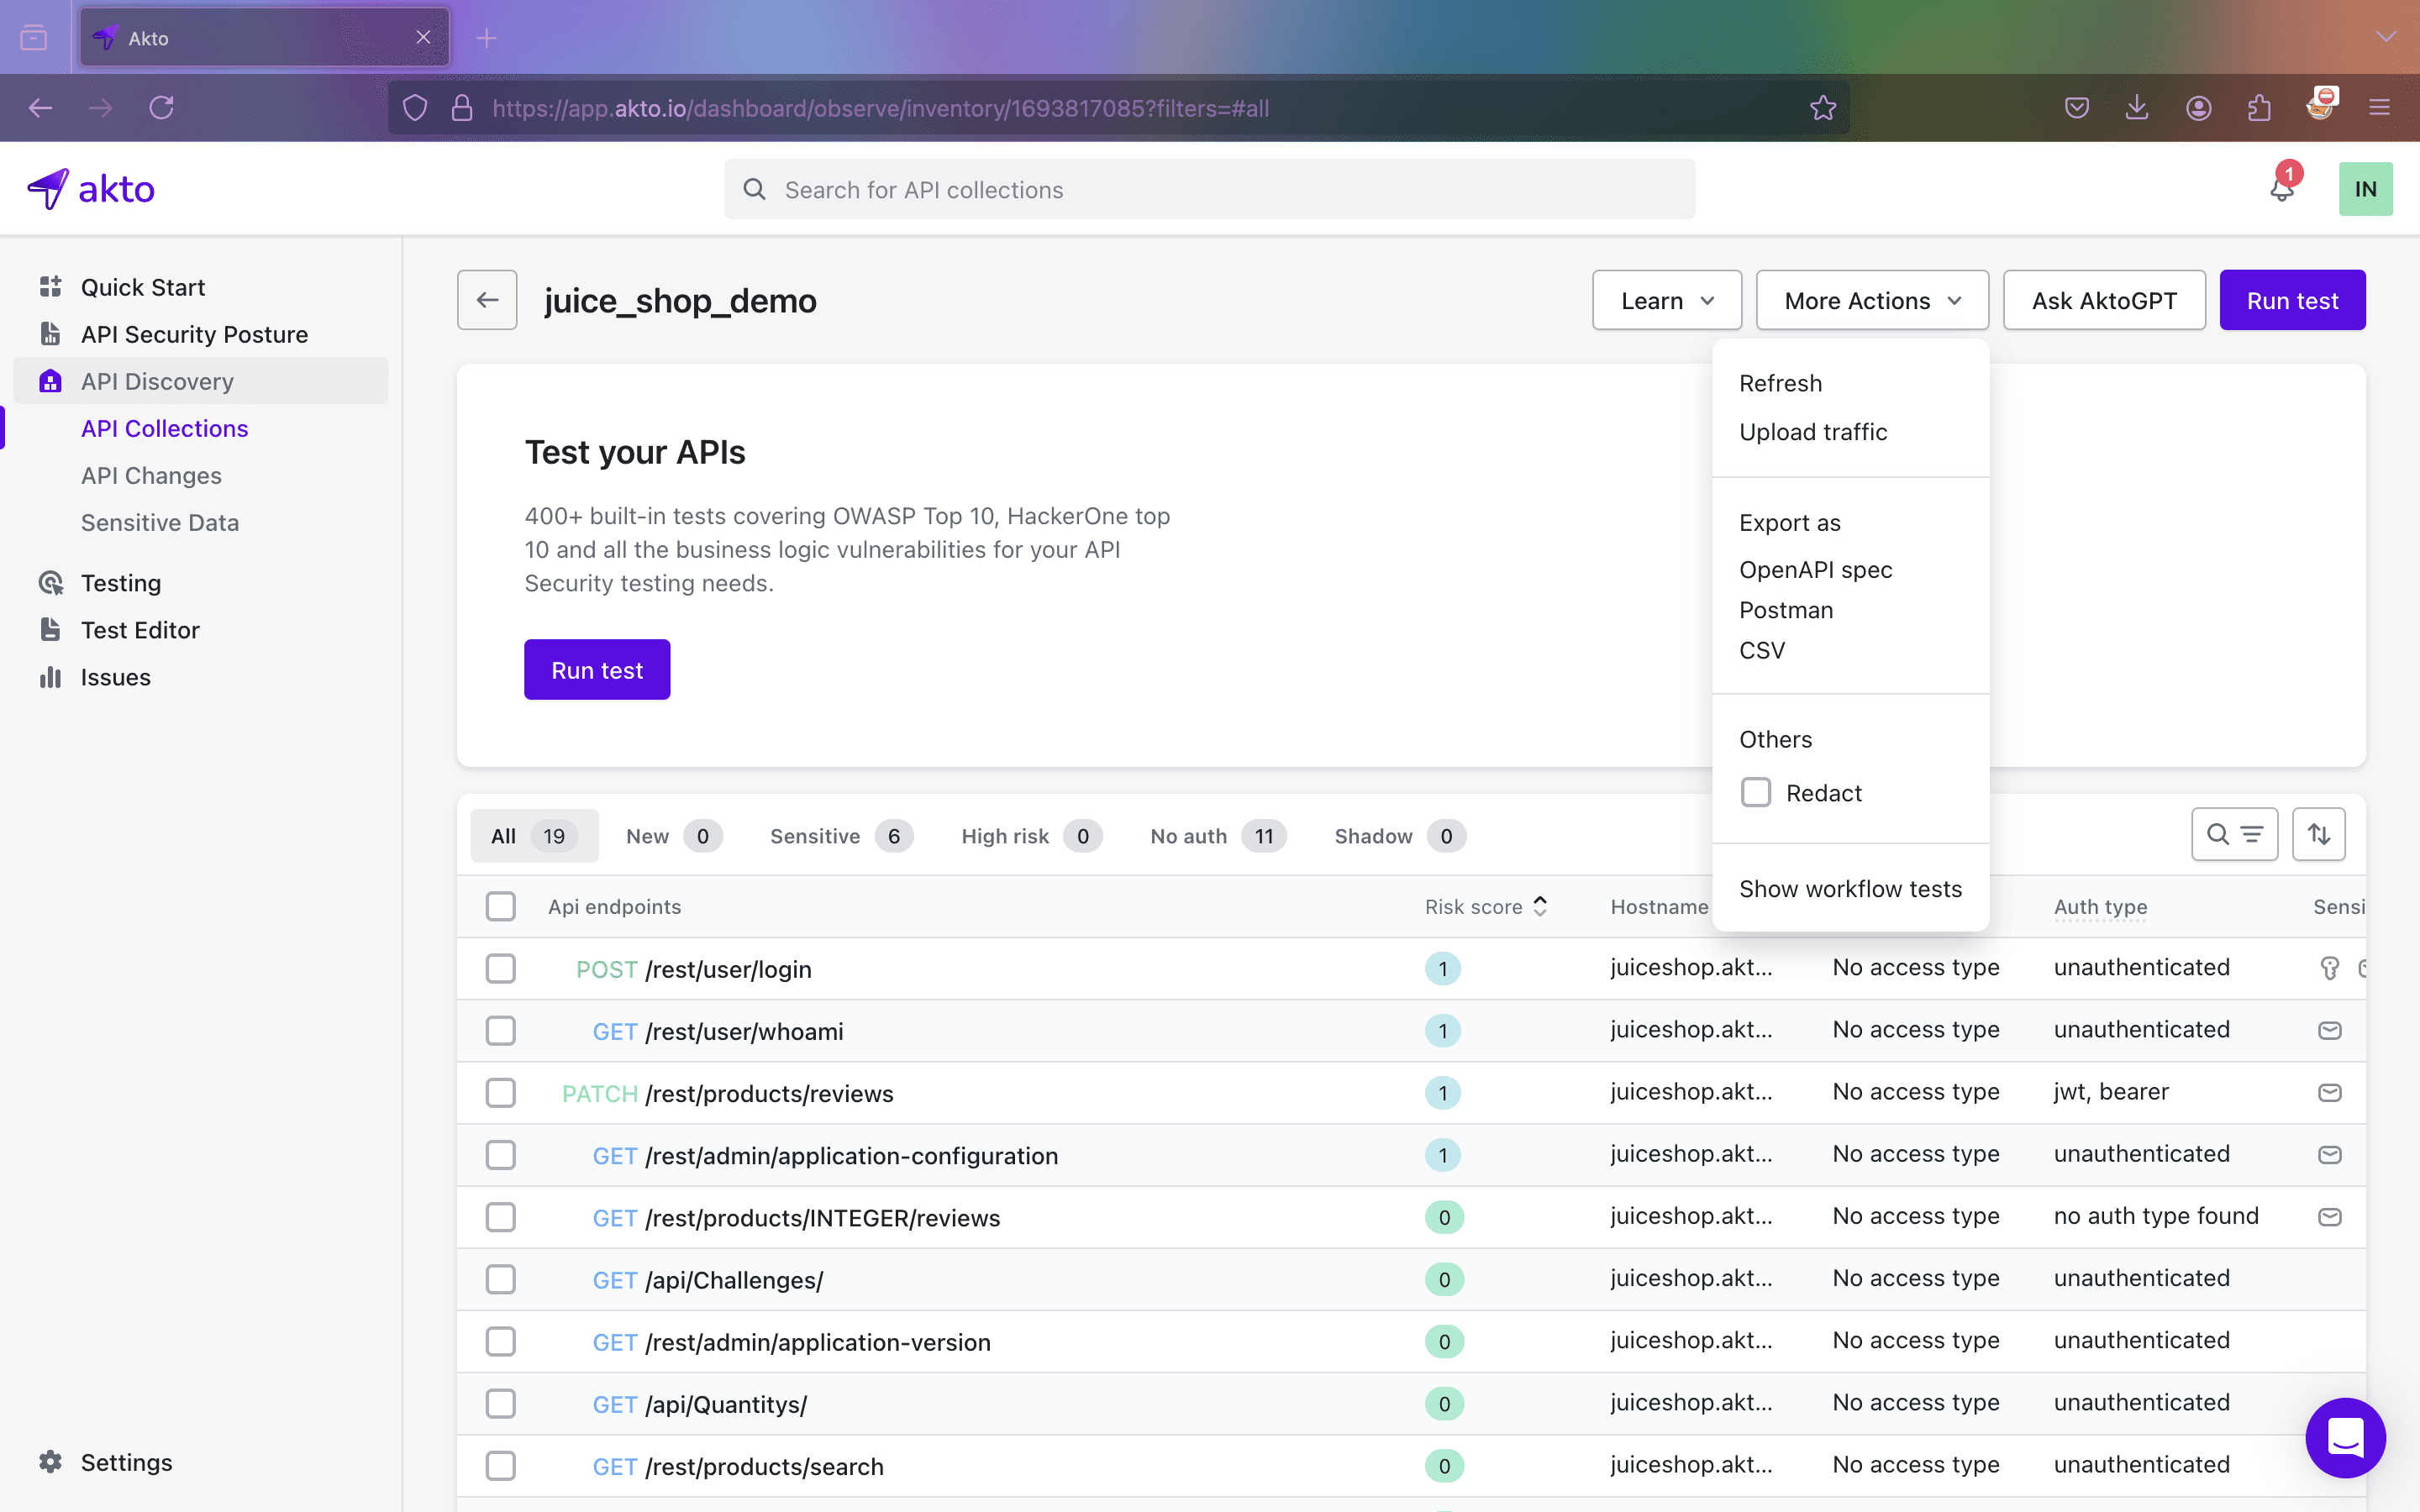
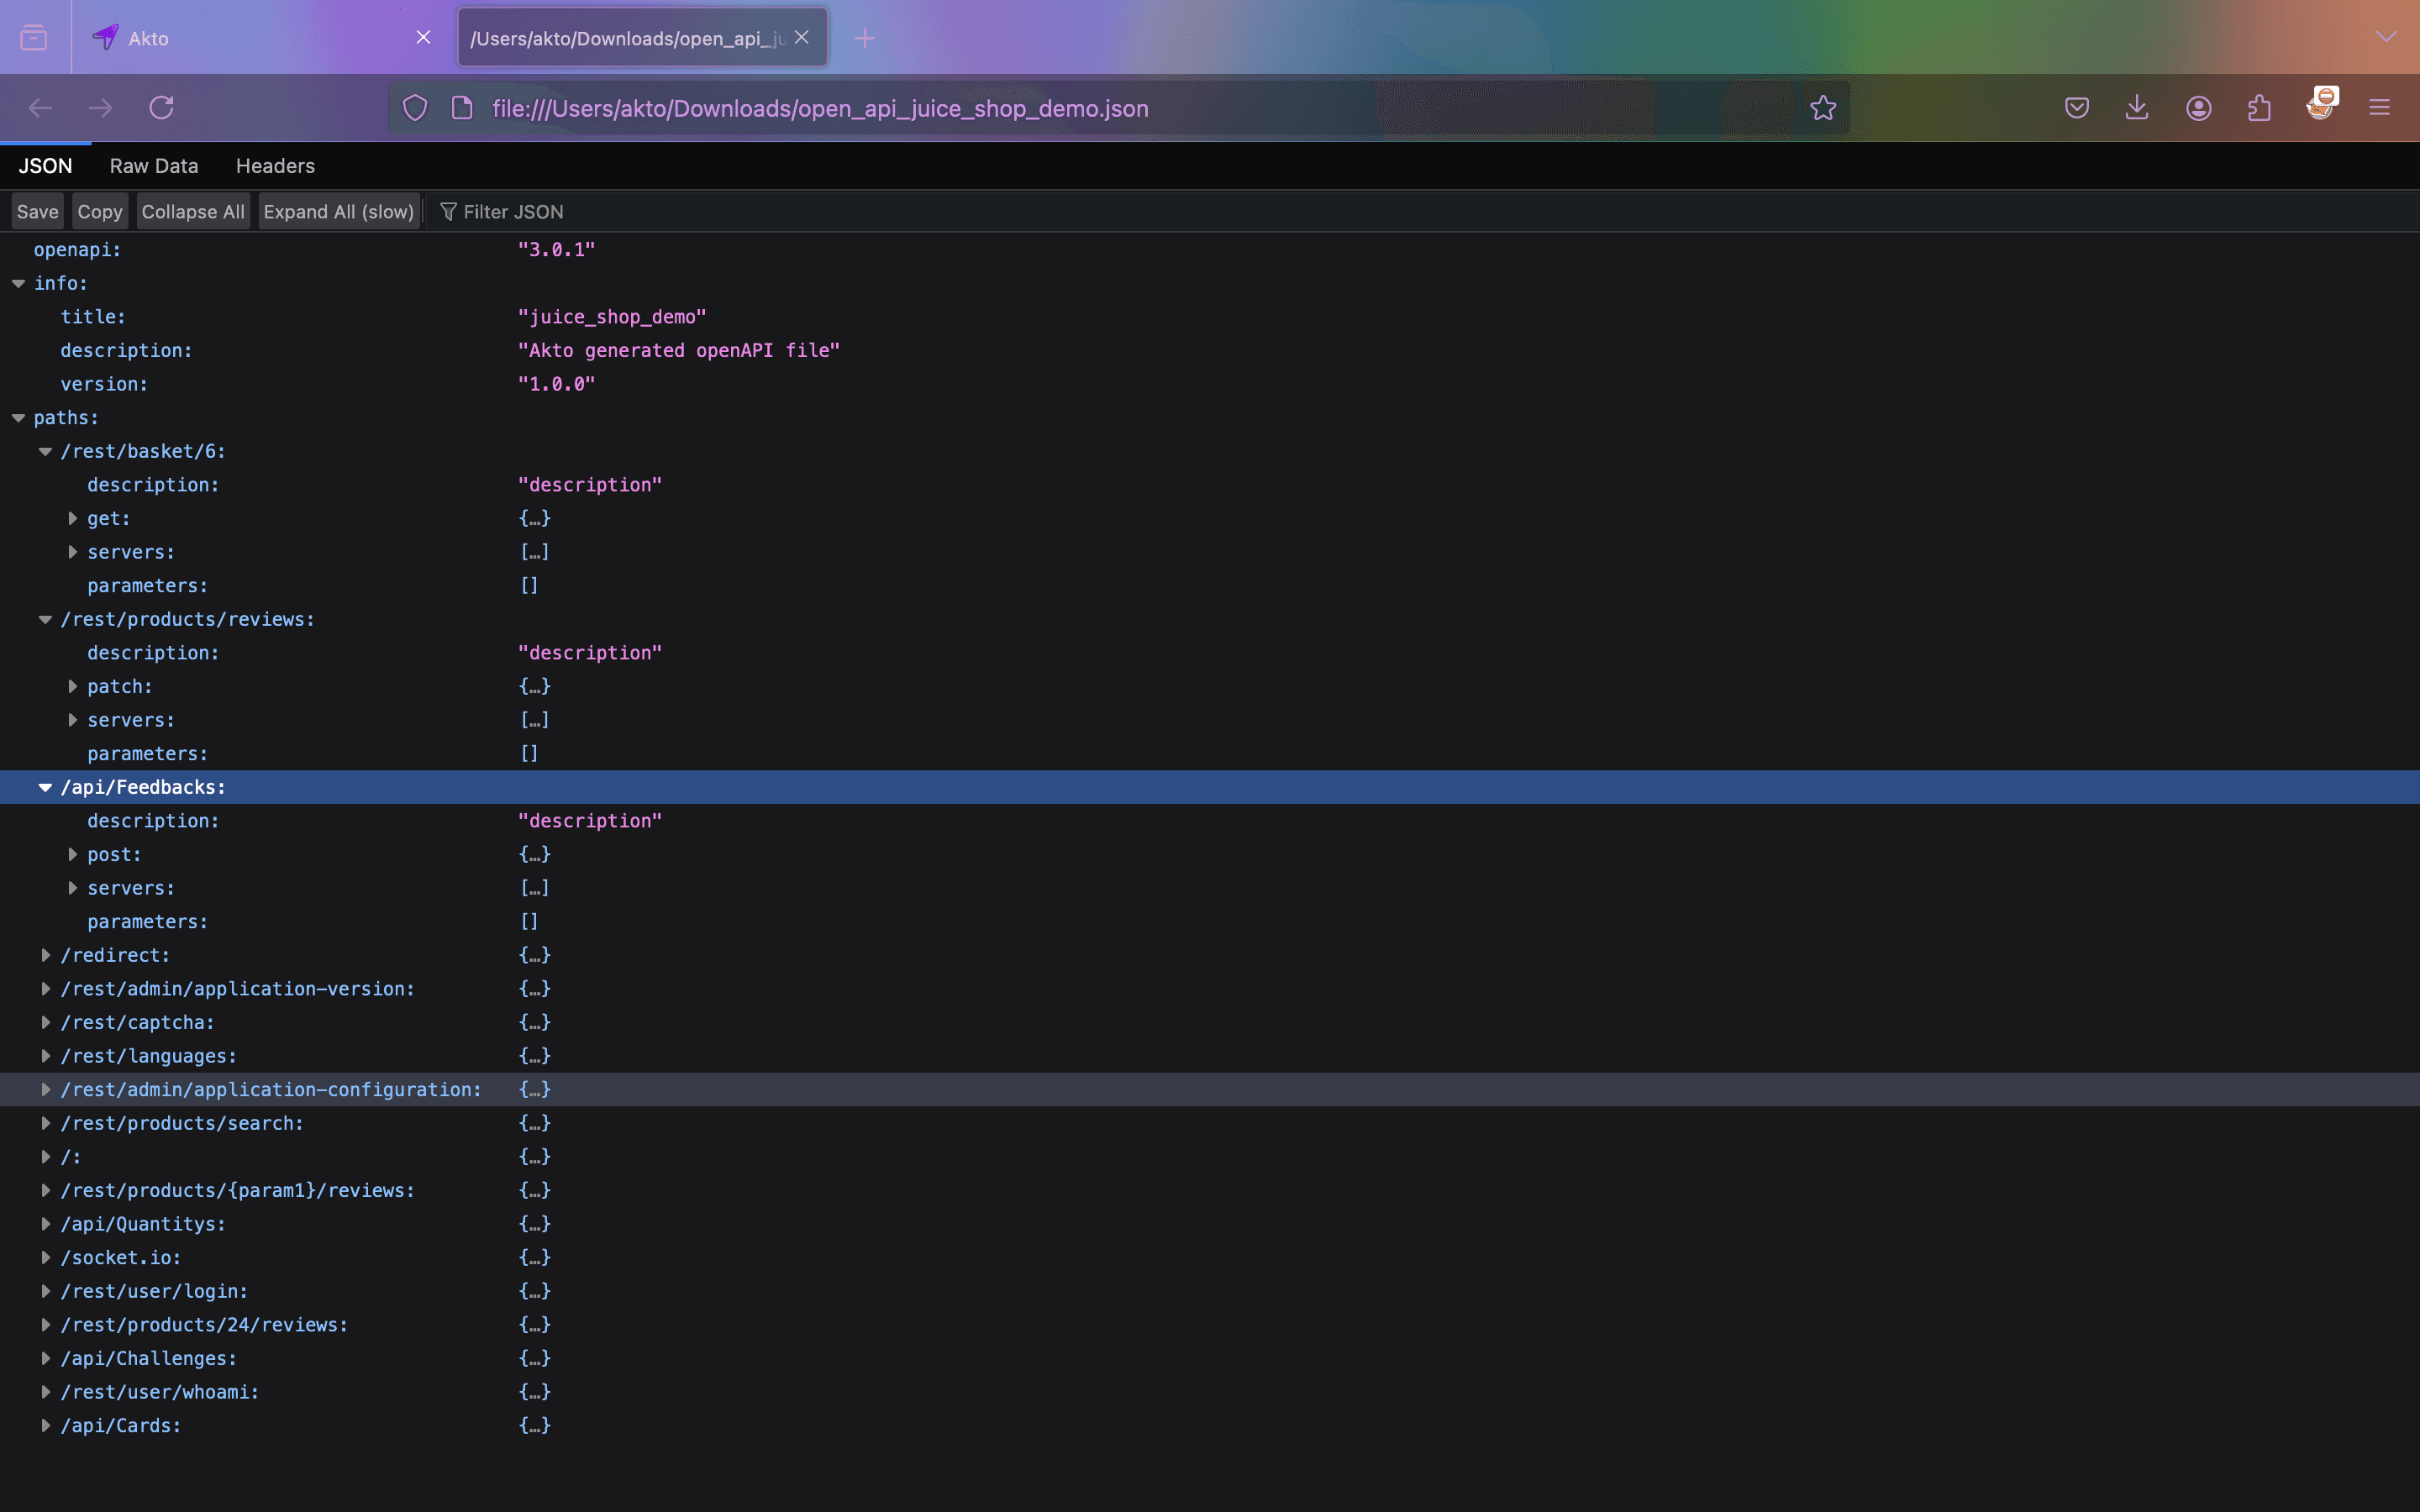
It will create and download the swagger file for you.
Open the swagger file and see what it looks like.
Final Thoughts
Swagger powerfully streamlines API development by providing standardized, interactive documentation. Its components, like Swagger UI, Editor, and Codegen, simplify API creation, testing, and integration, enhancing collaboration among developers, security teams, and even non-technical stakeholders. Swagger automates processes and improves consistency across API implementations, significantly reducing errors and accelerating development timelines. Organizations that adopt Swagger foster better communication and maintain high-quality, up-to-date API documentation.

Explore more from Akto
Blog
Be updated about everything related to API Security, new API vulnerabilities, industry news and product updates.
Events
Browse and register for upcoming sessions or catch up on what you missed with exclusive recordings
CVE Database
Find out everything about latest API CVE in popular products
Test Library
Discover and find tests from Akto's 100+ API Security test library. Choose your template or add a new template to start your API Security testing.
Documentation
Check out Akto's product documentation for all information related to features and how to use them.